Jump to content

High Sierra MBR and Firmware Check Patch 10.13.x


1 Screenshot

About This File

Patched OSInstaller.framework to allow macOS 10.13 installation on MBR partition.


To use those patched files you must follow HowTo to create an USB installer. You can't just run the app downloaded from Mac App Store.

The patch is made base on 落下爱@pcbeta 10.10.x MBR patch method, and more patch for 10.13 Firmware check by crazybirdy.


What is this patched OSInstaller doing?
1. Patch the MBR check, allow macOS 10.13 installation on MBR partition.
2. Patch the Firmware check, bypass the error of "
An error occurred while verifying firmware".
3.
This patched MBR OSInstaller method works with both MBR and GPT partition (GPT+recovery).

No longer need to set new SMbiosversion, FirmwareFeatures, and FirmwareFeaturesMask with this MBR-patch.


What's the difference between createinstallmedia method, MBR-Manual-Method, and MBR-Automatic-Method?
As the following....
1. createinstallmedia method,

    needs stage 1, stage 2 installation process, which is worked with GUID partition only.
2. MBR-Manual-Method (same as 10.12),

    install via stage 2 manually, which is worked with both MBR and GUID, HFS+ and APFS.

    We can manually format as MBR or GPT, HFS+ or APFS on installation screen like as 10.12.

    We can manually select MBR HFS+ partition to install 10.13 and 10.14 on installation screen now.

    Needn't to update the MBR-Manual-Method files, it will still work on 10.13, and 10.14 future versions, I think so.

    It can be installed as Fresh installation on formated blank partition only, but can't be installed as update from previous version.

3. MBR-Automatic-Method (new for 10.13+),

    install via stage 2 automatically, which is worked with both MBR and GUID, HFS+ and APFS.

    It can be installed as Fresh installation on formated blank partition, and can be installed as update from previous version.


How to make 10.13 installer for MBR (MBR-Manual-Method)?

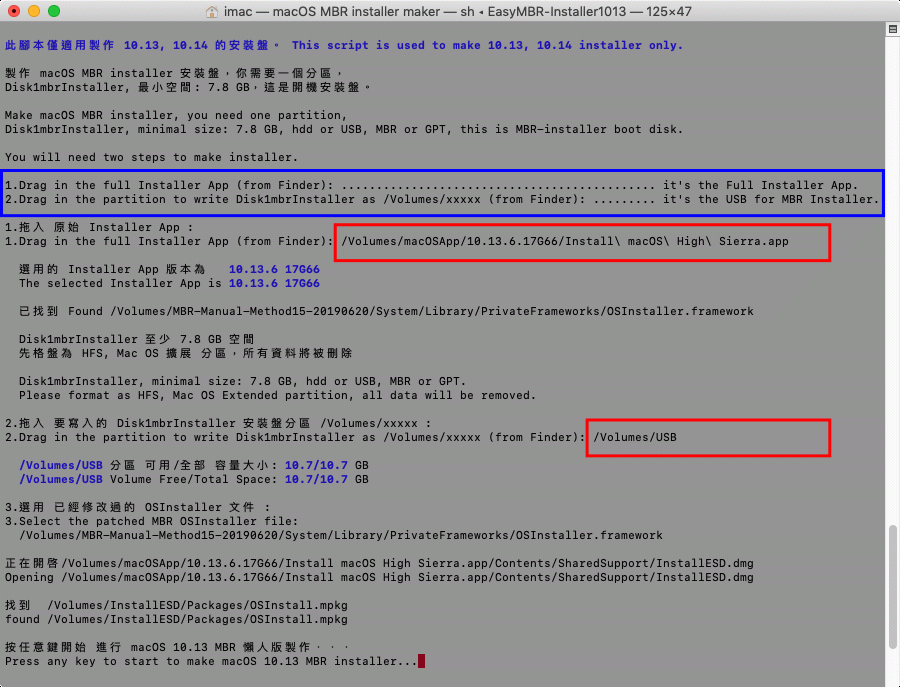
Just use EasyMBR-InstallerMaker to make installer, it works with both MBR and GPT.

Read HowTo inside the dmg first, same as 10.12.
Read HowTo Q/A Q6. How to download the full installer app via swscan.apple.com, instead of App Store?
Read HowTo Q/A Q7. How to update 10.13.x combo-update to MBR and GPT with installScript directly?


How to make 10.13 installer for MBR (MBR-Automatic-Method)?

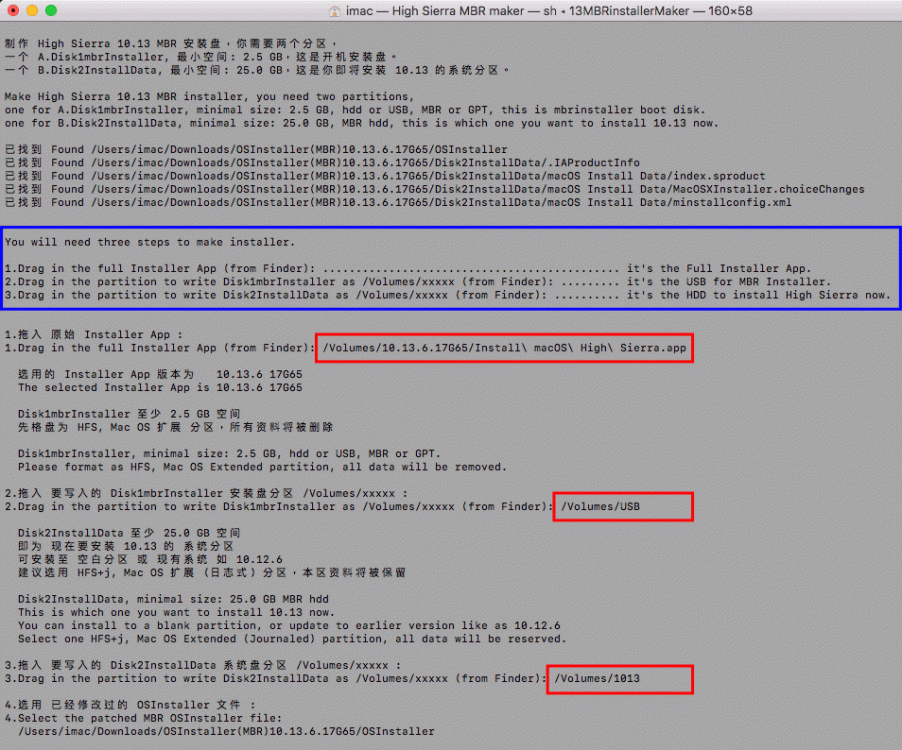
Just use 13MBRinstallerMaker to make installer, it works with both MBR and GPT.

Read HowTo inside the dmg first, new for 10.13+.
Read HowTo Q/A Q6. How to download the full installer app via swscan.apple.com, instead of App Store?
Read HowTo Q/A Q7. How to update 10.13.x combo-update to MBR and GPT with installScript directly?


And, need a SMBIOS supported with /System/Library/CoreServices/PlatformSupport.plist.


EasyMBR-Installer1013.gif.2042611dbe78ce7f7a88c6d059cf6d85.gif

13MBRinstallerMaker.thumb.gif.82857e8d6f2593a5df832a54a788c9fb.gif


What's New in Version 10.13.x   See changelog

Released

2020.07.13    Update Old-macOS-10+11+12/installScript_1012fullapp.

2020.05.30    Update Readme.

2020.02.25    Update Q7-Update-installScript.

2020.01.30    Update Q7-Update-installScript.

2019.12.06    Update Q6-DownloadFullApp

2019.11.02    Add Old-macOS-10+11+12/installScript_1012fullapp.

2019.11.01    Update Q7-Update-installScript.

2019.10.10    Update Q7-Update-installScript, Q8-MBR-Update1013.

2019.09.11    Update Q6-DownloadFullApp.

2019.02.13    Update script to make update-installer-dmg on Desktop. (Q7-Update-installScript/installScript_101X)

  • Like 5
  • Thanks 4
 Share


User Feedback

Recommended Comments


Pretty awesome!!I just wanna know how to solve the problem of mouse/keyboard freezing when booting into the install screen using Chameleon?And it seems that the USB kexts r not working any more!!

  • Like 1
Link to comment
Share on other sites

Hi buddy great work. I have an issue tho I boot up and installer error log shows up I have 2 portions named as described added my uuid of installdata copied base system ect to install data to and put the patched osinstall in osinstall.framework/xxx/xx so on can you tell me what I may have done wrong

  • Like 1
Link to comment
Share on other sites

Sorry bud I'm awful at writing. Show all files I used but as far as I can tell there is only one ia file the one you supply

Link to comment
Share on other sites

that's fine.


Tried to pm you says you can't get any messages so il write it here


Right ok so I don't need 2 portions just one e.g. I have a 8gb USB and vmwere I format USB as guid restore base system then make a packages folder in the same place as the old method and copy osinstalker.mpkg. From here copy the installdata folder of yours on root of USB then copy all shared support files in to installdata folder and adding the USB uuid as described in read me then in privateframwork add osinstall to Osinstall.framework is that correct. Sorry for being a pain iv just been over the read me over and over but I boot the USB and at setup screen well what should be setup screen just a restart option and a error log

Link to comment
Share on other sites

FYI,


I successfully upgraded DB6 to DB7 with my original DB6 Disk1mbrInstaller.  Only needed to replace OSInstall.mpkg from DB6/17A344b with OSInstall.mpkg from DB7/17A352a in /Disk1mbrInstaller/System/Installation/Packages folder.


Steps to upgrade install:

1) Directly run DB7 "Install macOS High Sierra Beta.app", targeting the desired HFS+ or APFS installation partition --> automatically creates "macOS Install Data" folder on that volume

2) At first restart, boot to Disk1mbrInstaller ---> choose language ---> files from install packages written to disk

3) At second restart, boot to fully upgraded High Sierra partition :)

  • Like 2
Link to comment
Share on other sites

Like mentioned above, I've now upgraded DB7 to DB8 with my original DB6 Disk1mbrInstaller. - only needed to replace OSInstall.mpkg in  /Disk1mbrInstaller/System/Installation/Packages to the new one from DB8/17A358a. 


Also when prepared with the full /S/L/E folder from "Core.pkg" (see post#3239 & 

How to create a macOS Installer which doesn't need bootloader kext injection (FakeSMC in pre-linked kernel), bypass High Sierra firmware and MBR check), I noticed my USB mouse is fully functional and I can access the installer menu items at the top (unlike when you boot to "macOS Install" in a mackintosh).


Update Sep 26 2017:  Upgraded to High Sierra 10.13.0 Release 17A365 with OSInstall.mpkg in /Disk1mbrInstaller/System/Installation/Packages

of DB9 Disk1mbrInstaller  :).

  • Like 1
Link to comment
Share on other sites

Are you creating 2 partitions on the target Hard Drive, or on the USB pen drive??

Sorry, but the english directions are not clear.


1. Create a bootable USB installation drive.

2. On the target HDD create 2 partitions... OR on the bootable USB create 2 partitions?? 


Not clear... are you creating a USB drive that is then patched and modified so that you install it to the target HDD?

or

are you copying files from the USB drive to the target HDD which now has 2 partitions and then once modified boot from the target HDD???


Dans

Link to comment
Share on other sites

Let me get this correct

Where it says "you need 2 partitions - one for A.Disk1mbrInstaller,  size 2.5Gb... this is on the USB?

and then B.Disk2Install Data... 25 Gb minimum....


1. I already created a USB drive and have the OS installer.app on there....

SO then...

are the 2 partitions A and B for the target HDD?


or


should I wipe the USB and then put A on it and B on the target HDD????


IF A &B are on the target HDD then you just install your boot loader and run it??

Link to comment
Share on other sites

Can someone clarify in English:

OSInstaller replace to /Volumes/Disk1mbrInstaller/System/Library/Privateframeworks/OSInstaller.framework/Version/A/OSinstaller


Is this meaning - copy  System/Library/Privateframeworks etc from Basesystem.dmg to DISK1MBRINSTALLER????

Link to comment
Share on other sites

Ok Crazybirdy thank you.

I installed on usb drive, and on hdd creating per your instructions...

Using Enoch2902, and the Installer (first one from release day, not subsequent update installer) & Nvidia 720 vid card, i5 processor 2300 MHz (6 year old machine)... have used this since snow leopard, ok ... so has old bios etc.


followed steps and also A4 A5 to get it to boot.


The system boots up and starts to load ok, then hangs with a 

local host com apple xlc launchd messages ..then hangs with


IOConsoleUsers: gIOScreenLockState 3, hs 0, bs 0, nov 0, sm 0x0


 Video card nv_disable=1 does not help ... removing all video card kext does not help...

Any suggestions as to cause?

Link to comment
Share on other sites

Yes, tried all that so no luck yet.... I will keep trying .... 

this new MacOS is a real tough one....

  • Like 1
Link to comment
Share on other sites

System starts booting, but then 

complains can't find  /Library/LaunchAgents...


I have S/L/Launch agents copied over from .dmg as per instructions...


If I copy S/L/Launchagents to /Library   then it complains about duplicates..!


Can you post picture of what the file structure should look like??  

Link to comment
Share on other sites


×
×
  • Create New...