How to Fix Corrupted MP4 File on a Mac
At some point, you’ve probably tried to open an MP4 on your Mac, only to realize it won’t play or looks damaged. We’ve run into these problems more times than we can count. Over the years, we’ve built up a list of solutions to repair corrupted MP4 files on Mac that have proven reliable, and we are ready to share them with you.
Why do MP4 Files Get Corrupted?
MP4 files aren’t as straightforward as they seem. They’re built from different components called “atoms” that store the actual video data and metadata like timestamps and file structure. The moov atom, which organizes the file’s metadata, is critical. If it gets corrupted, your file becomes unreadable, even if the video data itself is fine.
As a team, we’ve faced this issue more times than we’d like to admit. We had MP4s corrupted due to power loss in a digital camera—right in the middle of recording. The video file was ruined because the moov atom never got saved properly. Another time, file transfer process was cut short, and the mdat atom, which holds the actual media data, ended up incomplete, which left the video unplayable.
These situations happen more often than you’d think. Thankfully, that’s not the end, and there are many possible ways to fix unreadable mp4 files on Mac.
3 Simple Fixes to Try First
It’s always a good idea to try some quick and easy fixes first. We’ve encountered plenty of cases where the issue wasn’t as serious as it seemed.

- Try a different media player. Sometimes, a file that won’t open in QuickTime might play perfectly fine in VLC. Not all media players handle MP4 files the same way, so try a different player; it can save you a lot of hassle.
- Move the file to another device. We’ve often solved issues just by moving the file to another storage device or Mac. Bad sectors on a USB stick or drive can cause problems, so try it on another device.
- Repair the file on the device it was recorded with. If your video comes from a camera like a GoPro, try to put the SD card back in the camera. Many cameras have built-in repair features that automatically detect corrupted files and attempt to fix them. We’ve seen this work when a file wouldn’t play on a computer, but the camera was able to restore it.
If these quick fixes don’t do the trick, we’ll get into more advanced options next, let’s start with online tools that can repair MP4 files in just a few steps.
Fix Corrupted MP4 Files with Clever Online Video Repair
One of the easiest tools we recommend for a corrupted MP4 file on a Mac (or any other platform actually, since it is an online tool) is Clever Online Video Repair.
Unlike most free online services, Clever offers generous limits. It supports files up to 5 GB, ideal for larger videos. From our experience, Clever handles common video corruption issues more than well, especially for formats like MP4.
Here’s how to use Clever Online Video Repair to fix your MP4 file:
- Go to the Clever Online Video Repair website. The upload option appears directly on the homepage.

- Select your corrupted MP4 file. It also supports other formats like MOV, 3GP, or M4V.

- Choose your recording device or click “Unknown device” if you’re unsure which device was used to record the video.
- Provide a working reference file from the same device if the tool requests it. This step allows the system to apply the correct repair method and improves the chances of successful recovery.
- Click the “Repair” button. The repair process moves quickly, though larger files may take longer to upload.
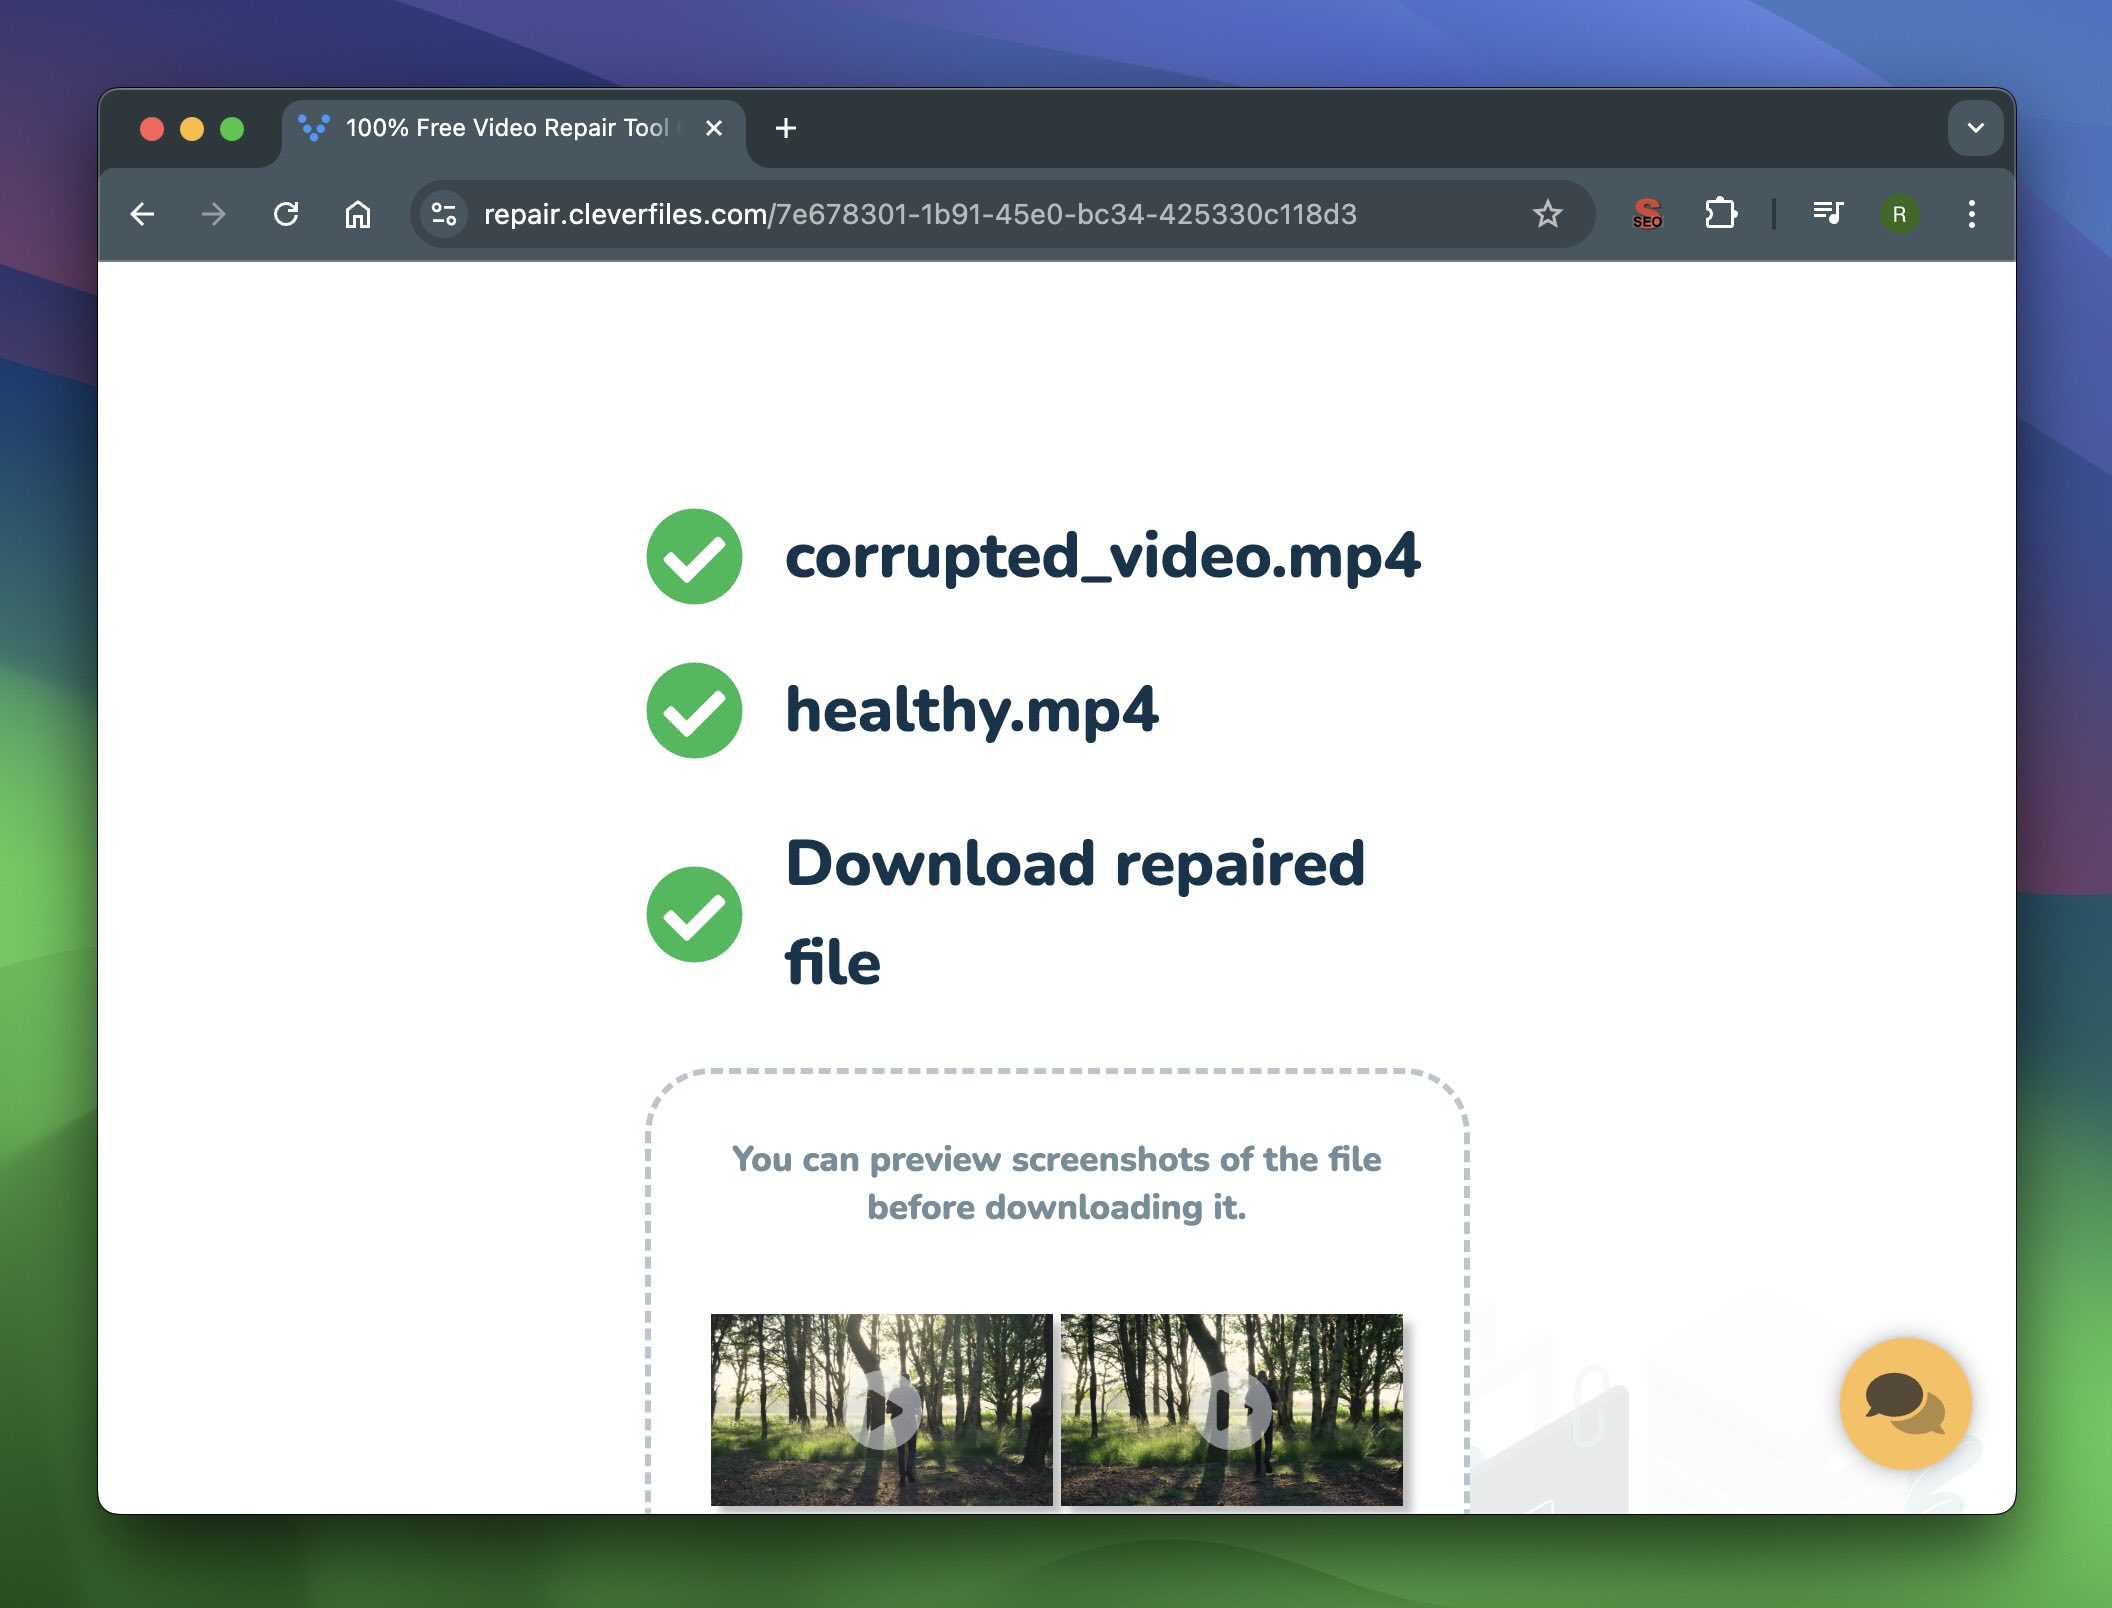
- Download your repaired file once the repair finishes. You’ll receive a link to download the file. If you create an account, you can store the repaired file in your profile. Without an account, the tool stores files for 24 hours before deleting them for privacy.


From our tests, Clever Online Video Repair, which ranks as number 1 in our list of Best Video Repair tools for Mac, consistently delivers fast results, especially for MP4 files corrupted due to incomplete transfers/recordings. It’s become our go-to tool for these cases, but keep in mind that for the best results, you’ll need to upload a non-broken video from the same device as a reference.
Try to Fix Corrupted MP4 Files in the VLC Media Player for Mac
VLC Media Player is another easy option. It’s a free tool that many people already use to play videos, but what most don’t know is that it also comes with a built-in feature to fix corrupted video files. We’ve used it countless times to repair videos that wouldn’t open or showed playback errors.
VLC’s repair function works particularly well when the corruption affects the video headers, which makes it hard for media players to interpret the file. While this feature officially supports AVI files, we’ve found that if you simply rename your corrupted MP4 file to AVI, it often does the trick. It’s a quick fix that works for many common issues.
Here’s how to repair an MP4 file using VLC on Mac:
- Find your corrupted MP4 file, right-click on it, and select “Rename.” Change the file extension from .mp4 to .avi and press Enter.

- Open VLC Media Player on your Mac. If you don’t have it installed, download and install it from the official VLC website.
- Go to VLC’s preferences. Under “Input/Codecs,” find the section labeled “Repair AVI Files.”

- Set the option to “Always Fix.” VLC will attempt to repair any corruption it finds within the AVI file.
- Play the MP4 file to see if the corruption is fixed.


From our experience, VLC repairs header-related issues very well. If the corruption is more severe, this method might not work, but it’s always worth a try.
Convert MP4 Files with Tools Like HandBrake and Shutter Encoder
If simpler methods like online tools or media players don’t work, another reliable way to fix a corrupted MP4 file is to convert it. Conversion, or re-encoding, involves decoding the existing MP4 video and then encoding it again from scratch. This process essentially rebuilds the video file structure, which can often bypass corruption issues.
We’ve used tools like HandBrake and Shutter Encoder to fix corrupted MP4 files. Both of these tools are free, widely used, and offer a range of options to handle MP4 video files.
Option A: HandBrake
HandBrake is one of the best free tools for re-encoding video files. It’s simple to use and supports a wide range of formats (MP4, MOV, and MKV.)
How to Fix a Corrupted MP4 File with HandBrake:
- Download and install HandBrake from the official HandBrake website. Once installed, open the app on your Mac.
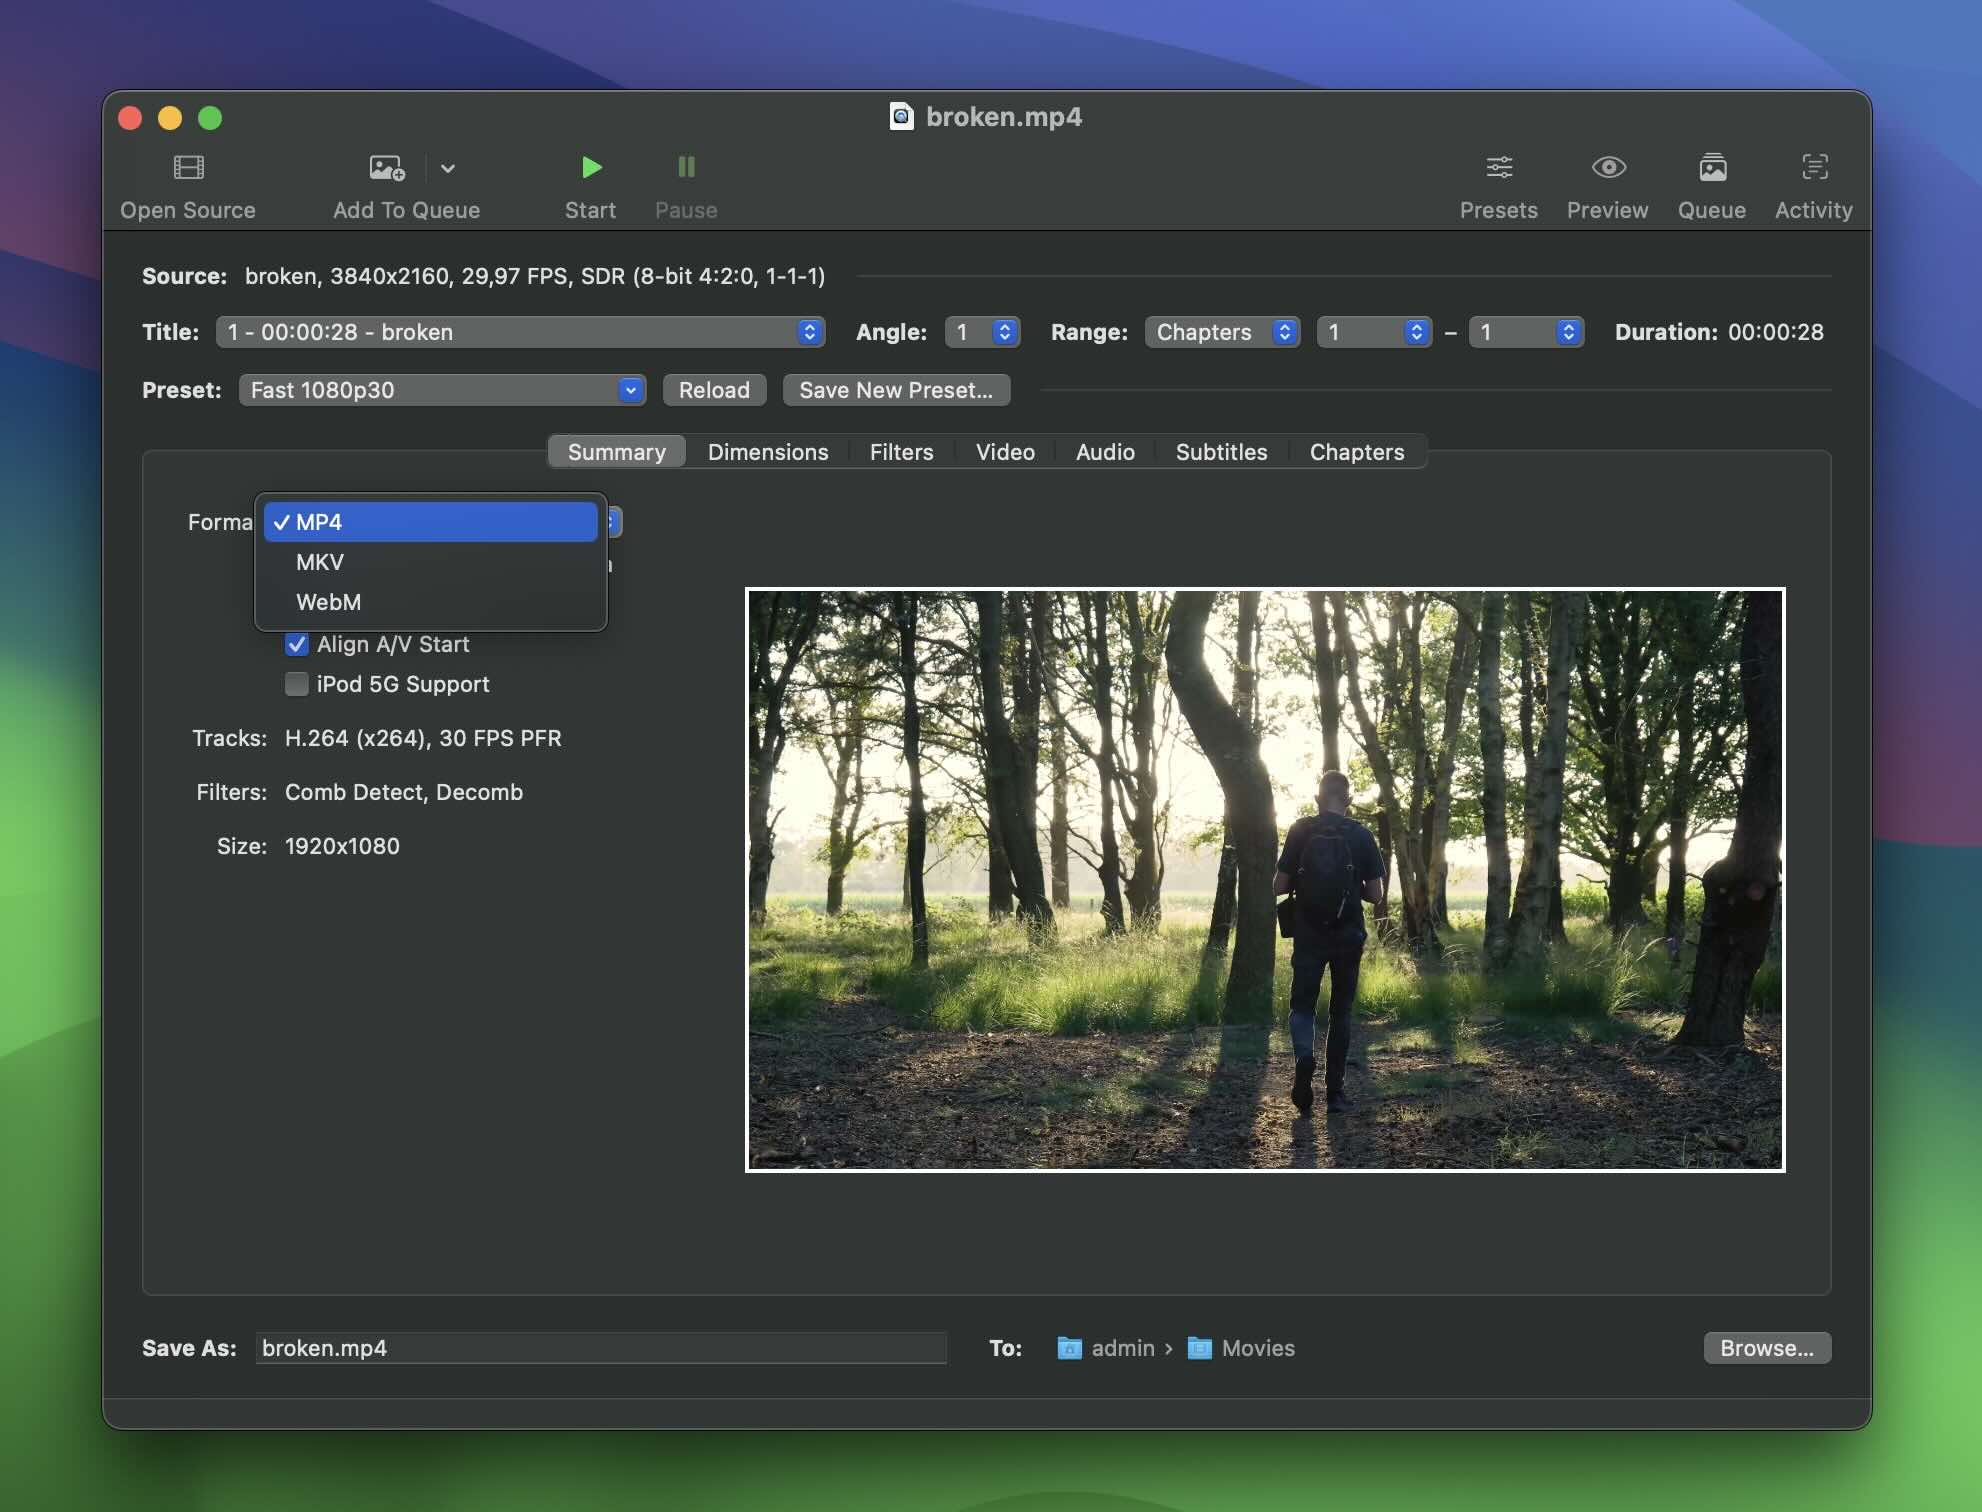
- Click “Open Source” and select the corrupted MP4 file you want to repair.

- Choose an output format. In the “Summary” tab, select a format. You can choose to convert the MP4 into a different format, like MKV or MOV, or choose to keep the file in the MP4 format. Why choose the same format? Sometimes re-encoding the file, even into the same MP4 format, can rebuild the file structure, and fix broken metadata, without changing the file extension. This keeps everything familiar and avoids compatibility issues with other software or devices that prefer MP4.
- It’s usually best to keep the quality as close to the original as possible to avoid any unnecessary degradation. We’ve found that the default settings generally work well.
- Select a destination folder where you want the repaired file saved.
- Click “Start” to begin the process. HandBrake will decode the existing video data and then encode it again.
- After HandBrake finishes, open the newly converted file in a media player like VLC to check if the corruption has been fixed. If the video plays smoothly, the conversion worked.


Option B: Shutter Encoder
Shutter Encoder is another excellent tool for corrupted MP4 repair through re-encoding. Just like HandBrake, it’s free and open-source.
Shutter Encoder’s combination of ease and power makes it a great tool for corrupted MP4 files. Plus, its use of FFmpeg provides broad codec support and reliable results. And speaking of FFmpeg, we’ll talk more about it directly for even deeper control later on.
How to Fix a Corrupted MP4 File with Shutter Encoder:
- Download and install Shutter Encoder from the official website. Shutter Encoder works seamlessly on both Intel-based Macs and the newer Apple Silicon Macs.
- Open Shutter Encoder and drag your corrupted MP4 file into the program, or use the “Browse” button to locate the file.

- You can select a codec in the “Choose function”.
- The default settings usually work just fine, but if you want more control, Shutter Encoder lets you tweak things like video quality, resolution, and bitrate to match the original.


- Click “Start Function” to kick off the re-encoding process.
- After it’s done, open the new file in a media player like VLC or QuickTime to see if the problem is fixed.
Can I Fix a Broken MP4 Using Mac Terminal?
The answer is yes, you can fix a broken MP4 file on your Mac in Terminal with FFmpeg. Since Shutter Encoder uses FFmpeg under the hood, you’ve already seen some of its power in action. However, if you use FFmpeg directly from the command line it might offer more control and flexibility, especially for complex MP4 corruption cases.
Here’s how to fix MP4 Files with FFmpeg in Terminal:
- If you haven’t already installed FFmpeg, you’ll need to do so. The easiest way to install it is Homebrew, a package manager for macOS.
- (If you don’t already have it) open Terminal and type the command to install Homebrew:
/bin/bash -c “$(curl -fsSL https://raw.githubusercontent.com/Homebrew/install/HEAD/install.sh)” - Once Homebrew is installed, type this command to install FFmpeg:
brew install ffmpeg
- Use the cd command in Terminal to navigate to the folder where your broken MP4 file is located. For example, if your file is in the “Downloads” folder, you would type:
cd ~/Downloads - Now that you’re in the folder where the broken file is, use the FFmpeg command to repair it:
ffmpeg -i brokenfile.mp4 -c copy repairedfile.mp4 brokenfile.mp4 is the name of your corrupted MP4, file.repairedfile.mp4 will be the name of the new, fixed file. The -c copy flag tells FFmpeg to copy the video and audio streams without re-encoding them. This can sometimes repair the file’s structure without altering the original quality.
 - FFmpeg will process the file, copying over the intact parts of the video while bypassing any corruption. Depending on the size of the file and the level of damage, this can take anywhere from a few seconds to several minutes.
- After FFmpeg finishes, check the newly created repairedfile.mp4.

 brokenfile.mp4 is the name of your corrupted MP4, file.repairedfile.mp4 will be the name of the new, fixed file. The -c copy flag tells FFmpeg to copy the video and audio streams without re-encoding them. This can sometimes repair the file’s structure without altering the original quality.
ffmpeg -i corrupted_video.mp4 -vf mpdecimate -c:v libx264 -preset fast -crf 22 -c:a aac output_video.mp4
This command re-encodes the video in libx264 (H.264 codec) and applies a preset for faster encoding with moderate compression. The -crf 22 option sets the quality level (lower values for higher quality), and -c:a aac re-encodes the audio as AAC. In many cases, this method has succeeded where a simple copy didn’t.
Final Thoughts
In our experience, most cases of corrupted MP4 video files result from incomplete recordings or interrupted file transfers. Simple fixes like those we covered earlier—such as Clever Online Video Repair—are usually enough to resolve these issues. However, we’ve encountered more peculiar cases where the camera didn’t even show that any files were recorded. This can happen because the logical references that lead to the physical location of the file on the storage device weren’t written correctly.
In situations like that, you’ll first need to retrieve the corrupted MP4 files before any repairs. For this, we recommend a data recovery tool like Disk Drill. It supports all kinds of storage devices, from SD cards to external hard drives, and it works seamlessly on the latest macOS versions like Sonoma and Sequoia. Disk Drill is particularly effective with MP4 files and handles high-resolution video formats just as well as standard ones. You can read about this in more detail in our Disk Drill review, where we go in-depth on its capabilities and performance. And if Disk Drill is not your cup of tea, there are many other good recovery tools available for Mac
FAQ
- If a recording ends abruptly (because of power loss, a low battery, or a camera malfunction), the file may not finalize properly, which leaves it damaged or unreadable.
- Corruption can occur when a file transfer between devices is interrupted. If you disconnect the device or experience an unexpected system error during the process can result in a corrupted file.
- If the storage device (such as an SD card, external hard drive, or USB) contains bad sectors, it can cause problems.
- A corrupted file system on the storage device may damage the video files stored there.
- In some cases, viruses or malware interfere with file operations, which might cause damage to MP4 videos.
- A software crash or system error during the creation of the video can lead to incomplete or corrupted files.
If the file still won’t open, the issue may be with the file itself. You can rename the file extension to .avi and open it in VLC, which sometimes repairs minor corruption. If these options don’t work, you may need to use a video repair tool, like Clever Online Video Repair or Shutter Encoder, to fix the file.